AP Physics Lab
The Atwood Machine
Discussion:
 The "ideal" Atwood machine consists of two masses,
M1 and M2, connected by a massless, inelastic
string which passes over a frictionless pulley. The diagram at right
shows an Atwood machine, along with a free-body diagram for each
mass, and the resulting equations of motion.
The "ideal" Atwood machine consists of two masses,
M1 and M2, connected by a massless, inelastic
string which passes over a frictionless pulley. The diagram at right
shows an Atwood machine, along with a free-body diagram for each
mass, and the resulting equations of motion.
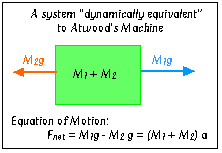 Alternatively, this system could be considered to be a
single mass, M1 + M2, being pulled to the left
by a force of magnitude M2g, and pulled to the right by a
force of magnitude M1g. The net force on this object must
be M1g - M2g, which by Newton's Second Law must
equal the object's mass, M1 + M2, times its
acceleration, a. In other words:
Alternatively, this system could be considered to be a
single mass, M1 + M2, being pulled to the left
by a force of magnitude M2g, and pulled to the right by a
force of magnitude M1g. The net force on this object must
be M1g - M2g, which by Newton's Second Law must
equal the object's mass, M1 + M2, times its
acceleration, a. In other words:

Solving for a gives:

You should verify that the original system of equations yields the
same expression for acceleration, albeit after somewhat more algebra.
How can you determine this acceleration in practice? If you can
construct a velocity vs. time graph for the motion, it should be a
straight line (since the acceleration is constant) and the
acceleration of the system is the slope of the line...
Equipment:
|
Pasco "Smart Pulley"
|
standard masses
|
|
ring stand
|
ring stand clamp
|
|
c-clamp
|
string
|
Procedure:
The Apparatus:
- Use the ring-stand clamp to attach the "Smart Pulley" to the
ring stand.(The "Smart Pulley" is "smart" because it is equipped
with a photocell which you will use to determine the velocity and
acceleration of the system.) Clamp the ring stand to the edge of
your lab table so that the masses will be able to reach the floor.
- Attach one end of your string to a 100 gram mass. Thread the
other end through the pulley, and attach a second 100 gram mass to
the other end. IMPORTANT!!
The pulley is a delicate (and expensive) device. You want to allow
the masses to move a reasonable distance, but be sure that
you have a long enough string so that the rising mass cannot
strike the pulley as the other mass falls to the floor!
Have your instructor check you setup
before you proceed! (Notice that if M1 = M2, the
system will remain at rest at any position, or move at constant
velocity if you start it moving - Newton's First Law strikes
again!)
- Plug the "Smart Pulley"'s jack into the DG1
port of the computer interface. Be sure that the interface is
properly attached to the computer, and that the power supply is
plugged in. Switch the interface on - the green light on the front
should be on.
The Timing Software:
 Load the "ULI Timer" software. The computer screen
should look like the diagram at left. If the pulley is attached
correctly, you should see the icon labeled "1" (in the upper-left
corner of the screen) change from dark to light to dark as the
photocell is covered and uncovered by a spoke of the wheel.
Load the "ULI Timer" software. The computer screen
should look like the diagram at left. If the pulley is attached
correctly, you should see the icon labeled "1" (in the upper-left
corner of the screen) change from dark to light to dark as the
photocell is covered and uncovered by a spoke of the wheel.
- In the Timing menu, select "Trigger on Gate" (it should get a
check mark). This means that the timer will start when the pulley
starts turning instead of immediately when you push the "Start"
button.
 Now, construct a data table for your experiment. In
the Window menu, select "New Table". This opens a new window
labeled (Surprise!) "Table". Click in the top box of the first
column to the right of the "Row" column, then go to the Data menu
and select "Dt1". This will place the
interval times in your data table. Now click the next row, and
select "Mid Time" from the Data menu. Your data-table window
should look like the one shown at right.
Now, construct a data table for your experiment. In
the Window menu, select "New Table". This opens a new window
labeled (Surprise!) "Table". Click in the top box of the first
column to the right of the "Row" column, then go to the Data menu
and select "Dt1". This will place the
interval times in your data table. Now click the next row, and
select "Mid Time" from the Data menu. Your data-table window
should look like the one shown at right.
A "Run":
- Add the smallest mass available (10 grams) to
one of the masses on your apparatus. Notice that when you release
the masses, the system accelerates - even with a very small mass
difference.
- Raise the larger mass to its starting position. Press the
"Start" button on the ULI Timer. The timer will not start until
you let go of the system. To avoid a lot of meaningless data, be
ready to click the "Stop" button just before the
mass hits the floor. (Practice! Teamwork!) Timing data for this
trial should be displayed in your data table.
Analyzing the Data:
The ULI Timer software will hold only one data set at a time, so
something has to be done with the data you have just collected. The
ULI Timer has the capability to graph the data, but instead of
learning how to use it, it might be more efficient to transfer the
data to the "Graphical Analysis" software you already know how to
use.
- Use the mouse to select both data columns from your data
table. Copy the data to the clipboard.
 Open the
"Graphical Analysis" program, and paste your data into its data
table.
Open the
"Graphical Analysis" program, and paste your data into its data
table.
- Label the column that the ULI Timer called "Dt1" as "dt" (units are seconds), and label
the "Mid Time" column "t" (units are seconds).
- The pulley (and also each mass, since they are all connected)
moves 0.015 meter during each time interval dt. Therefore, its
average velocity during each time interval is 0.015/dt (in
meters/second). To add this to your data table, select "New
Column" from the Data menu. For its label, type "v = 0.015/dt"
(units are m/s).
- Click on the axes labels of the graph window to change the
horizontal quantity to time, t, and the vertical quantity to
velocity, v. You have a velocity vs. time graph for your motion.
- Using a "Linear" analysis model, you can find the slope of the
velocity vs. time graph.
What now?
Be sure to record the masses used for each trial.
Change the added mass on your apparatus to 20 grams.
Go back to the ULI Timer software and make another "run".
Copy your data to the clipboard, and paste it into a "New Data
Set" in the Graphical Analysis program. Notice that you do not need
to retype the column headings for the new data set - nice feature!
Continue to add mass until the acceleration becomes too large -
above all, protect the pulley!
Results:
You can calculate the "theoretical" acceleration for each trial
using equation 1 shown above. Be sure to show a sample calculation,
and display your results in table form. Of course, what about the
uncertainties of both the "theoretical" and "experimental"
accelerations?
Conclusions:
How closely do the "theoretical" and "experimental" accelerations
agree? What do you think would do the most to improve the precision of this experiment?
last update January 16, 2008 by Jerry L. Stanbrough