Physics Experiment
Images in a Converging Lens


Questions:
- What sort of images are formed by a converging lens?
- Do ray diagrams actually locate images produced by converging
lenses?
Discussion:
You will find that this experiment is similar in many ways to the
experiment
"Images in
a Converging (Concave) Mirror" from Chapter 29. It is important
that you keep in mind, however, that mirrors form images due to
reflection, while lenses form images due to refraction.
Equipment:
|
converging lens
|
modeling clay
|
meter stick
|
|
straightedge
|
light source (candle)
|
matches
|
|
tape
|
paper strip
|
paper
|
|
3x5 card
|
|
|
Procedure:
IMPORTANT: Be safety-conscious around the candle flame! If you
have long hair, tie it back. Roll up any long, loose sleeves. Keep
your face away from the candle flame.
A. Setup:
|
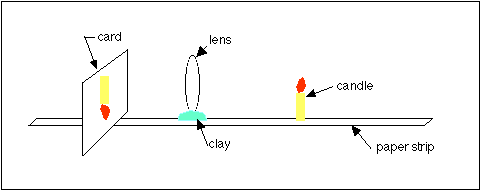
|
|
The apparatus
|
- Tear off a paper strip about 2 meters long and tape it to your
work surface. (You may need to work on the floor.)
- Take a small piece of modeling clay and use it to support your
converging lens at about the middle of the paper strip. Be sure to
mark and label the position of the lens on the paper strip.
B. Determine the focal length of your lens:
- Place the battery into the light source (or light your
candle), and place the light several meters (if possible) from the
lens, in line with the paper strip.
- Using the 3x5 card as a screen, locate the image of the light.
It should be a very small dot of light, located at the focus of
the lens. Mark and label the focus on the paper strip.
- You can check the accuracy of your focus as follows: Place
your light source at the focus. The lens should then produce a
parallel beam of light. You can check this with your 3x5 screen.
(Does the spot on the card stay the same size as you move it away
from the lens?)
C. Locating some images:
- Place the light source as far as possible from the lens on one
side of the paper strip. Mark this position "O1" (object #1).
- Using the 3x5 card as a screen, locate the image of the object
on the other side of the lens. Label its position "I1" (image #1).
- Move the light source closer to the lens (be sure it is
outside of the focus...) and find the corresponding image. Label
these positions "O2" and "I2".
- Continue to move the light source closer to the lens until you
have located at least 5 or 6 images. As you do so, make a note of
the relative sizes of the images.
D. Object inside the focus:
Where does the image go when the light source is closer to the
lens than 1 focal length? Remove the lens and the supporting clay
from the paper strip - be sure that the location of the lens is
marked on the paper strip!. Notice that when the light source (or any
object) is closer than 1 focal length from the converging lens, the
lens functions as a simple "magnifying glass": The image is virtual,
right-side-up, enlarged, and on the same side of the lens as the
object.
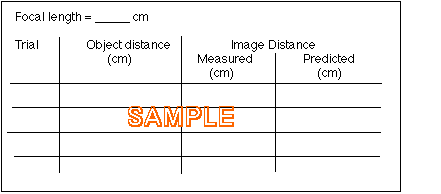
E. Record the data:
Construct a data table and record the focal length of the lens, as
well as the object and image distances measured from your tape.
|
A Sample Data Table
|
|
F. Results:
Carefully construct a scale ray diagram (or use the lens
equations) to predict the location and size of each image in your
experiment. Measure and record the image distance in your data table.
G. Conclusions:
Well?
References:
Haber-Schaim, et. al., Laboratory Guide to PSSC
Physics, Fourth Edition, p. 6
Robinson, Laboratory Manual for Conceptual Physics,
p. 263-6
Murphy, Laboratory Physics, p. 155-7
Genzer & Younger, Laboratory Investigations in
Physics, p. 175
last update December 4, 1997 by JL Stanbrough
(jstanbro@venus.net)