Physics Experiment
Images in a Plane Mirror - Ray Tracing
Method


![[Help]](../../../NavIcons/Help.GIF)
Question:
An experiment is a carefully-planned set of observations designed to
answer a question or test a hypothesis. For this experiment, the
question is:
"If an object is placed in front of a plane (flat) mirror,
where will the image of the object be located, and what does its
location say about the way light reflects?"
Discussion:
When you look in a mirror, you see your image "in the mirror" -
but where, precisely, is the image located? It may not have occurred
to you that an image even has a location, but it must. In this
experiment, you will attempt to locate it. Its location will probably
surprise you!
Try this:
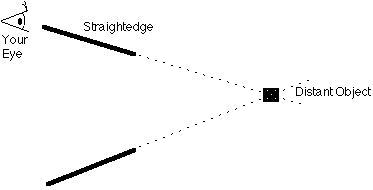 Pick
some reasonably distant object (across the room is far enough) and
look directly at it. Now hold up a straightedge (the edge of a book
will do) so that the straightedge is in line with the object and your
eye. Notice that you may now move your head (leaving the straightedge
still) and the straightedge still determines a line pointing directly
at the distant object. In fact, this line is the path that the light
ray must take to get from the distant object to your eye. If you move
to some other location and repeat this procedure, you would establish
a second line pointing directly at the distant object - and if the
object is located on both lines, it must be located at the
intersection of the 2 lines that you have created.
Pick
some reasonably distant object (across the room is far enough) and
look directly at it. Now hold up a straightedge (the edge of a book
will do) so that the straightedge is in line with the object and your
eye. Notice that you may now move your head (leaving the straightedge
still) and the straightedge still determines a line pointing directly
at the distant object. In fact, this line is the path that the light
ray must take to get from the distant object to your eye. If you move
to some other location and repeat this procedure, you would establish
a second line pointing directly at the distant object - and if the
object is located on both lines, it must be located at the
intersection of the 2 lines that you have created.
This is the method (called ray tracing) that you
will use in this experiment to locate an image in a plane mirror.
Instead of a distant object, you will be looking at the image of a
pin in a mirror, and your "rays" will point at the image of the pin,
not the pin itself.
Equipment:
|
plane mirror
|
cardboard
|
support for mirror
|
|
pin
|
tape
|
protractor
|
|
straightedge
|
paper
|
graph paper
|
Procedure:
- Place a blank piece of paper on the cardboard, and draw a
straight line across the middle of the paper. Label this line
"Mirror".
- Support the mirror so that it will stand vertically using a
block and a rubber band. Place the mirror on the paper so that its
FRONT EDGE (where the reflection occurs) is on the mirror
line.
- Stick the pin into the paper in front of the mirror so that
you can see its image in the mirror. Label this point "O1" (for
object #1).
- Sight along the straightedge at the IMAGE of the object pin in
the mirror. Draw a line along the straightedge to record its
position and label it "I1" (for Image #1).

- DO NOT MOVE THE OBJECT PIN OR THE MIRROR! - Move your eye to
another position in front of the mirror. Repeat step 4 to
establish a second line pointing directly at the image. Be sure to
label this line "I1" also.
- The two lines that you have established should intersect at
the location of the image - but how precisely have we located this
image? A physicist is always trying to verify her measurements and
establish their precision. One easy way to see how accurate your
measurements are is to establish a third line as a check. Go back
to step 4 again to establish this third line.
- Now that this image has been located by three lines, you may
move the object pin to another location. Label this position "O2".
Now repeat steps 4 - 6 to locate the image of this pin. Label the
image pins "I2". Be sure that you do not move the mirror from the
mirror line!
- After locating 2 or 3 objects, your paper will probably be
pretty-well covered with lines and labels. Remove this paper,
redraw the mirror line on a clean sheet, and continue. How many
images should you locate? Well, you can't locate too many. Locate
at least 10, if you have time. Try to locate your objects at a
wide range of distances from the mirror - some fairly close, and
some as far away as convenient on your paper.
- Once the paper is removed from the cardboard and the mirror is
out of the way, use a straightedge to carefully extend the lines
until they intersect to locate the images. You may very well be
surprised at the location of the image!
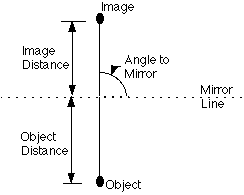
- Draw a line between each object and its corresponding image.
Carefully measure the distance (in centimeters) from each object
and image to the mirror line, and the angle between the mirror
line and the line connecting the image and object. In most cases,
your 3 lines will not intersect in exactly the same place - in
this case you will need to estimate ("eyeball") the point that you
want to call the image position. Be sure to mark this position on
your paper. Record your data in the data
table provided.
Results:
You probably see a relationship between object and image distances
from your data table, but scientists have found that it is usually
far more instructive to view their results in the form of a graph
rather than tables of numbers.
- On the graph paper, the two axes have been drawn for you.
Notice that the origin of the graph is near the lower-left corner
of the page. Notice that the horizontal (across) axis is labeled
"Object Distance", and the vertical (up and down) axis is labeled
"Image Distance". It is conventional to place the quantity that
you change (the object distance) on the horizontal axis, and the
quantity that nature changed (the image distance) on the vertical
axis. The scale for the axes is chosen so that you have the
largest convenient graph on the page. This means that you want the
graph to be as large as possible without resorting to some strange
scaling (like 7.358 cm per square!). On this graph, each dark line
represents 2.0 cm, and each small square represents 0.2 cm.
- Plot the data points on the graph. Now, draw the BEST SMOOTH
CURVE through the data points (for this experiment, the best
smooth curve is probably a straight line). DO NOT PLAY "CONNECT
THE DOTS"!
- The graph has been titled "Object Distance vs. Image Distance
for a Plane Mirror". All graphs should have a title.
Conclusions:
Write a short paragraph summarizing the results of your
experiment. In particular, the experiment was designed to answer a
question (remember?) - so what's the answer? How confident are you in
your answer? (Go back and look at how closely your 3 lines intersect
at one point.) If your results conflict in some way with the
"accepted" (textbook) ideas - why do you think this happened? (Hint:
do NOT (NEVER, NEVER, NEVER) use the terms "human error" or
"experimental error". If you made a mistake (human error), go back
and fix it. If some aspect of the equipment or technique used in the
experiment was not precise enough to enable you to answer the
question (experimental error) confidently, then, specifically, what
needs to be changed and how should it be changed?) In other words, I
want you to write a short paragraph, but I expect some thought to go
into it!
last update October 11, 2001 by JL
Stanbrough