BHS -> Staff -> Mr. Stanbrough -> AP Physics-> Kinematics-> this page
To measure the acceleration of free fall, "g", using an inclined plane.
Around 1600, the amazing Galileo Galilei was able to show, experimentally, not only that the acceleration of objects in free fall was constant, but was able to determine a pretty good value for this acceleration. Galileo performed this feat by rolling wooden balls down long inclined planes, and he didn't even have the luxury of a clock!
Today, we can recreate Galileo's triumph with very little effort using an air track or dynamics track and a motion sensor.
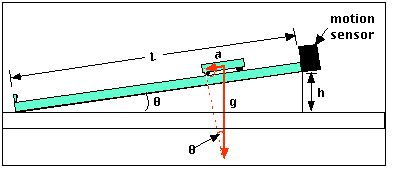
If a is the cart's acceleration down the track, and ![]() is the angle that the ramp makes with the horizontal, then from the
diagram:
is the angle that the ramp makes with the horizontal, then from the
diagram:
so the graph of a vs. h should be a straight line with slope g/L.
Measuring h and L is pretty straightforward. You can determine the acceleration, a, from the slope of the velocity vs. time graph produced by the motion sensor for the motion. This isn't the way Galileo did it, but it's pretty slick!
|
Pasco Science WorkshopTM interface |
motion sensor |
|
meter stick/metric ruler |
air track or dynamics track |
|
ring stand & clamp (optional) |
notebooks, etc. to prop up the incline |
|
level |
If you have made several runs at each height, it might not be necessary to add error bars to the graph. Draw the best fit regression line, and get regression statistics for the acceleration vs. height graph, assuming it looks linear. You can calculate "g" from the slope of this line, right? Also, be sure to determine the uncertainty in your value of "g". What is the percent of difference between your calculated value and an "accepted value" of "g" (consult the Handbook of Physics & Chemistry)?
So, what do you think? In particular,